This article on examples describes a creation of adapterom (or customers) for Flexberry Service Bus (service bus) that allows user to send messages and to receive them. The result of the implementation of such adapters is successfully adopted by the respective client a message.
For the creation of adapters for example, you will need the following tools:
- MS Visual Studio - to create their own application adapters sending/receiving messages
- Docker is a software to automate the deployment and management of applications in a virtualization environment on the operating system level. Required, if not already deployed and ready-to-use administrative application bus and its service.
- PowerShell is required to work with Docker, if you want local settings and run the tire and its service
In the implementation process will create two console applications:
- The app, which will be sent message. In this case it will be a console application on the command line you enter the message, later to be transferred by bus to the receiving application.
- App, wichitahouse message, the output of which will display soobshenii sent to the user.
Code applications posted in examples for Flexberry Service Bus on GitHub. How to work with GitHub is described on the website https://help.github.com or at https://git-scm.com
Description HTTP requests to interact with Flexberry Service Bus
sending a message to the bus
You can send a message by specifying its field values into a JSON structure and send it in the body of a POST request to bus.
- Method: POST
- Path: /Message
- The request body:
 // The message body.
 "Body": "string",
 // The ID of the message type.
 "MessageTypeID": "string",
 // The client ID of the sender.
 "ClientID": "string",
 // Post tags.
 "Tags": {},
 // The attachment.
 "Attachment": "string",
 // The priority (the higher the number, the higher the priority).
 "Priority": 0
- Example:
POST http://localhost:7085/RestService/Message
{
 "Body": "Message body",
 "MessageTypeID": "MsgType1",
 "ClientID": "Client1",
 "Tags": { "tag1": "tag1value", "tag2": "tag2value" },
 "Attachment": "MessageAttachment",
 "Priority": 0
}
get a list of messages available for the specified tenant
The request specifies the client identifier, returns an array of objects, each of which stores information about a single message: the message identifier the identifier of the message type, priority, the time of the message.
- Path: /Messages
- Parameters:
clientId (обязательный) – идентификатор клиента
- The response body:
{
 // Unique identifier of the message.
 "Id": "string",
 // The ID of the message type.
 "MessageTypeID": "string",
 // The priority of the message.
 "Priority": 0,
 // Time of the message.
 "MessageFormingTime": "2015-04-07T04:35:30.198 Z"
}
- Example:
http://localhost:7085/RestService/Messages?clientId=client1
Receive messages by client ID, index and message type
The request is processed as follows: the list of messages of the given type for the given client sorted primarily by priority (descending) and then by date of formation (for ascending order). Then from the resulting list select the message with the specified index. The server’s response contains a JSON structure with fields of the message.
- Method: GET
- Path: /Message
- Parameters:
clientId (обязательный) – идентификатор клиента
messageTypeId (обязательный) – идентификатор типа сообщения
index (обязательный) – индекс сообщения в упорядоченном списке
- The response body:
{
 // The message ID.
 "Id": "string",
 // The message body.
 "Body": "string",
 // Time of the message.
 "MessageFormingTime": "2015-04-07T04:35:30.212 Z",

 // The ID of the message type.
 "MessageTypeID": "string",
 // The name of the sender of the message.
 "SenderName": "string",
 // Group name message.
 "GroupID": "string",
 // Post tags.
 "Tags": {},
 // The attachment.
 "Attachment": "string"
}
- Example: To receive a message priority to be sent, you should request the message with index 0:
http://localhost:7085/RestService/Message?clientId=client1&messageTypeId=msgType1&index=0
the receipt of the message by a unique identifier
When you request a list of messages from the server or request the same message information message includes the message ID. Using this ID you can then get the message again, if necessary.
- Method: GET
- Path: /Message/{id}
- Parameters: id (required, part of the URL) – message identifier
- The response body:
{
 "Id": "string",
 "Body": "string",
 "MessageFormingTime": "2015-04-07T04:35:30.212 Z",
 "MessageTypeID": "string",
 "SenderName": "string",
 "GroupID": "string",
 "Tags": {},
 "Attachment": "string"
}
- Example:
http://localhost:7085/RestService/Message/{330732E9-7DB6-42C6-883D-E1596F4FBF78}
removing the message from the bus
To remove the message also by the ID.
- Method: DELETE
- Path: /Message/{id}
- Parameters:
id (обязательный, часть URL) – идентификатор сообщения
- Example:
DELETE http://localhost:7085/RestService/Message/{330732E9-7DB6-42C6-883D-E1596F4FBF78}
Request sending a message to the client via the callback
To receive messages on the initiative of the bus (callback) through HTTP requires the client adapter implement processing of the HTTP request like the following:
- Method: POST
- Path: /Message
- The request body:
{
 // Unique identifier of the message.
 "Id": "string",
 // The message body.
 "Body": "string",
 // Time of the message.
 "MessageFormingTime": "string",
 // The ID of the message type.
 "MessageTypeID": "string",
 // The name of the sender of the message.
 "SenderName": "string",
 // Group name message.
 "GroupID": "string",
 // Post tags.
 "Tags": { "tag1": "tag1value" },
 // The attachment.
 "Attachment": []
}
Work with the administrative application
For applications sending / receiving messages, you must have access to a running instance of the bus (administrative application). This action requires the administrative application and the address of a running service bus. You can get them in the following ways:
- administrative application - locally at http://localhost:1818/. This option is possible, if you use Docker.
- service - locally at http://localhost:7085/RestService. This option is available if you use
Docker. - using the addresses provided by the Administrator, in the case of centrally flattened tires
Also for further work adapters you need to:
- create a message type that will participate in the process of transmitting / receiving
- customers ‘ bus
- to make the subscription for customers receiving the messages
- permits transmission of messages.
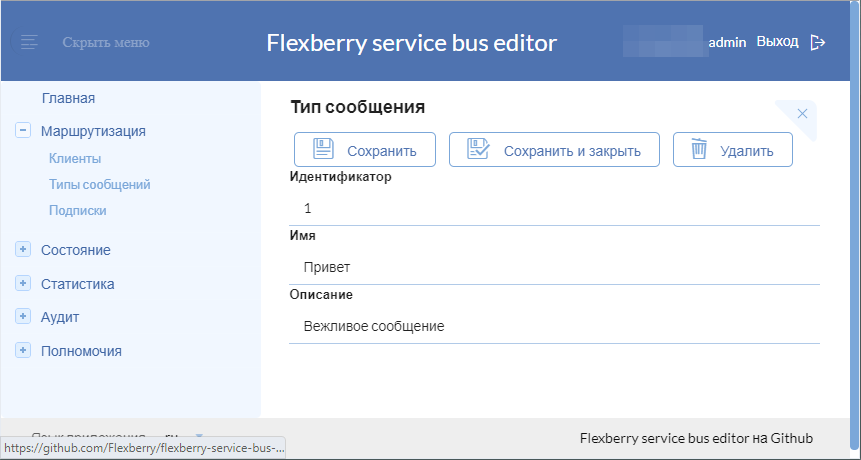
Create message type
- Run an administrative application
- In the tree on the left in “Routing” choose the menu item “message Types”
- Click “Add”
- On the form to indicate:
- the name of the message type: you can define arbitrary
- ID will be required when configuring adapters. The name can be set arbitrary, but if it consists of multiple words, it must be written beryllium style (for example, MessageType).
- also possible to add message type description
- Save click “Save and close”
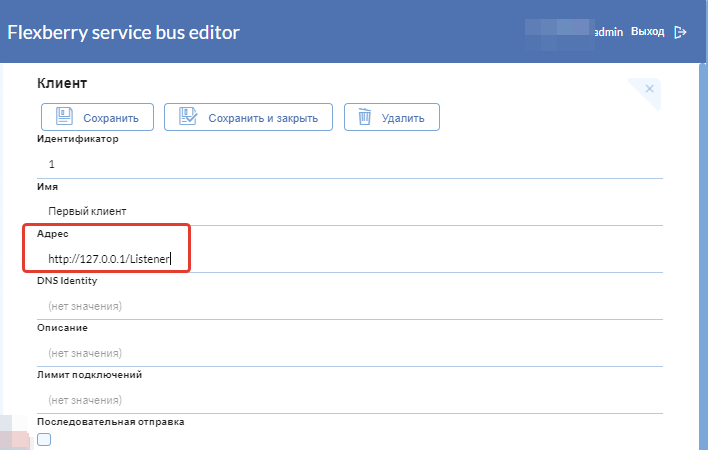
Registration of the client in service bus
- Open the administration application
- In the tree on the left in “Routing” choose the menu item “Clients”
- Click “Add”
- On the form to indicate:
- customer name - you can specify a
- ID will be required when configuring adapters. The name can be set arbitrary, but if it consists of multiple words, it must be written beryllium style (for example, MessageSender).
- address is required for clients receiving the messages. It must be taken from config matches the generated adapter receiving the messages.
- the remaining fields do not need to create the described examples
- Click “Save and close” on the form.
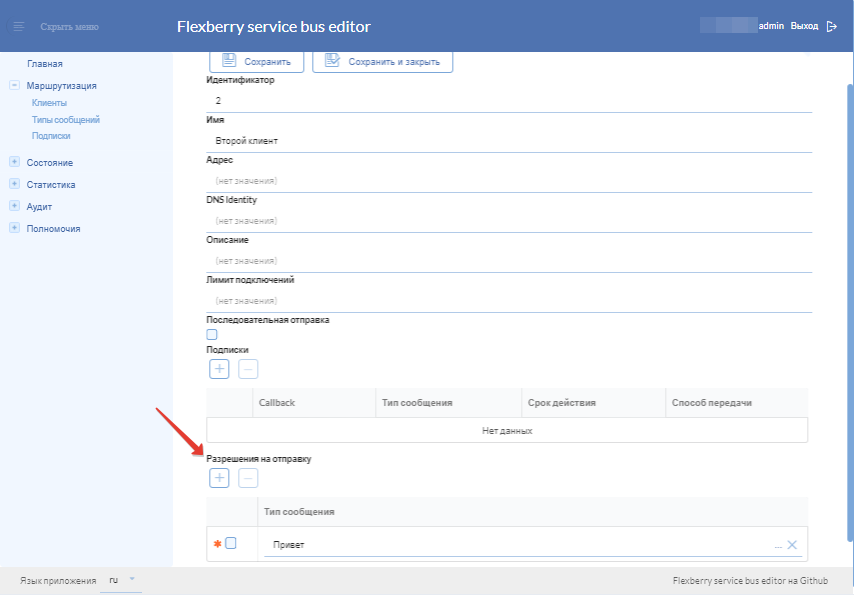
Permission to send messages
For the client sending the message, you need to add the permission to send messages:
- expand the menu item “Permission to send” message
- click “Add”
- you choose your previously created message type
- click “Save and close” on the form.
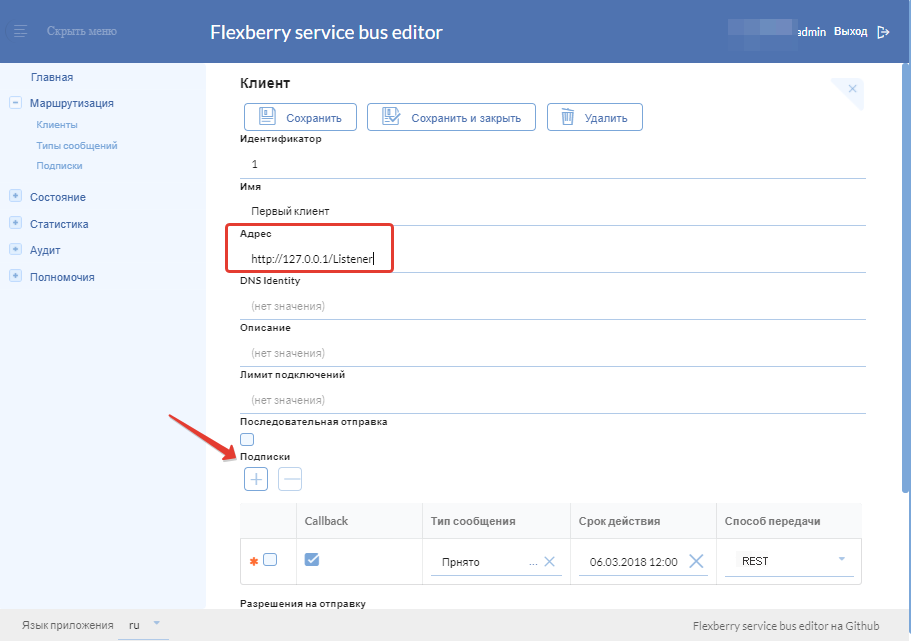
the Formation of a subscription to a message
For the customer receiving the message, you need to create a subscription for the message.
- In the tree on the left in “Routing” choose the menu item “Subscribe to posts”
- On the opened form:
- choose the client that receives the message created earlier
- the message type that you created earlier
- to set the date of termination of the subscription
- “Pass through” is a service used to send messages. For example need REST.
- Save click “Save and close”
Example of creating a client that sends messages
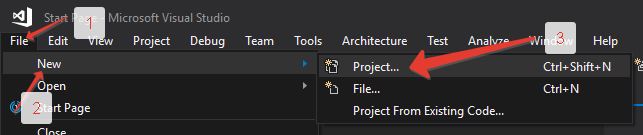
create a console application
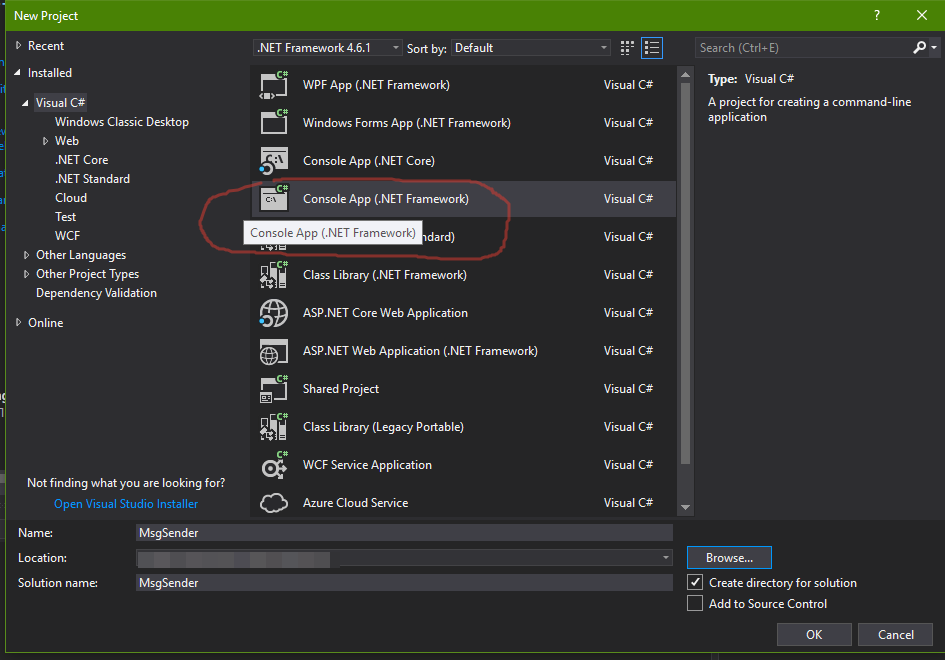
To create a console application, you can use MS Visual Studio](https://www.visualstudio.com).
In the opened window, enter the application name and its location.
coding adapter
Once the application is created, the file will be opened with the possibility of editing the code:
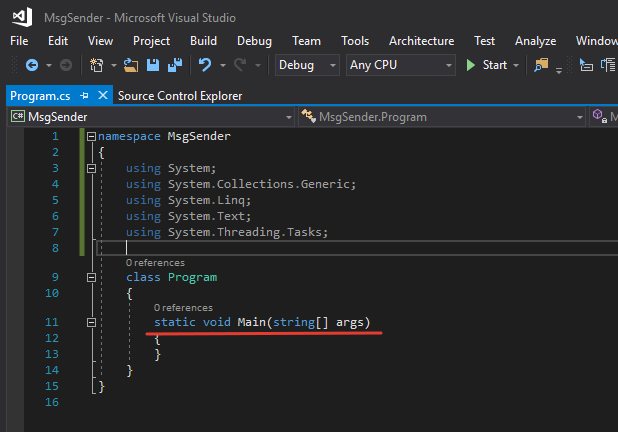
Code file Program.cs need to be replaced sleduyushim:
using System;
using System.Net;
using System.Text;
using System.Configuration;
using Newtonsoft.Json;

namespace MsgSender
{
    class Program
    {
        static void Main(string[] args)
        {

            string msgBody = "";

            while (msgBody != "exit")
            {
                Console.Write("Enter your msg (for exit type \"exit\"): ");

                msgBody = Console.ReadLine();

                // Create a message.
                string jsonData = JsonConvert.SerializeObject(new
                {
                    Body = msgBody,
                    ClientID = ConfigurationManager.AppSettings["SenderID"],
                    MessageTypeID = ConfigurationManager.AppSettings["MessageTypeID"]
                });

                string url = ConfigurationManager.AppSettings["Address"] + "/Message";

                using (var webClient = new WebClient())
                {
                    webClient.Encoding = Encoding.UTF8;
                    webClient.Headers[HttpRequestHeader.ContentType] = "application/json";
                    webClient.UploadString(url, POST, jsonData);
                    Console.WriteLine("Message sent");
                }
            }
        }
    }
}
setup configuration file
- Open in
MS Visual Studioin the project created by the adapter sending the messages fileApp.config - Add next cod:
<appSettings>
    <add key="SenderID" value=""/>
    <add key="MessageTypeID" value=""/>
    <add key="Address" value="http://localhost:7085/RestService"/>
</appSettings>
Key SenderID (client is sending the message) and MessageTypeID (message type) to specify the administrative key of the application.
Address must contain the address of a deployed tire.
Example of creating a client that receives messages
Create a console application
Console application for a client that accepts messages generated by the same algorithm as for the adapter that is sending messages.
coding adapter
Code file Program.cs need to be replaced sleduyushim:
using System;
using System.Net;
using System.Text;
using System.Threading;
using System.Configuration;

namespace MsgRecipient
{
    class Program
    {
        static void Main(string[] args)
        {
            while (true)
            {
                string url = ConfigurationManager.AppSettings["Address"] + "/Messages?clientId=" + ConfigurationManager.AppSettings["RecipientID"];

                using (var webClient = new WebClient())
                {
                    webClient.Encoding = Encoding.UTF8;
                    var response = webClient.DownloadString(url);
                    Console.WriteLine(response);
                }

                Thread.Sleep(5000);
            }
        }
    }
}
to Supplement the configuration file
- Open in
MS Visual Studioin the project created by the adapter sending the messages fileApp.config - Add next cod:
<appSettings>
  <add key="RecipientID" value=""/>
  <add key="Address" value="http://localhost:7085/RestService"/>
</appSettings>
Key RecipientID (host customer) to specify the key from the administrative application.
Address must contain the address of a deployed tire.
Results
To send-receive messages, you need to run the application.
MS Visual Studio must be running as AdministratorThe result of the answer includes all otpravleniya messages to the client.